Thursday, September 29, 2011

SharePoint Search Center Basics

This post will touch the basics of setting up an Enterprise Search Center.

Setup SharePoint Search Service


1. Central Administration -> Manage Service Applications

2. Select Search Service Application and click Manage in the Ribbon.
(If its not there, create it from New in the Ribbon)

From here there are tons of different aspects of search that can be configured, but for now I'll focus on the pure basics. And that's crawl, without crawling there isn't much to search on.

Start with setting up a daily crawl, on the Quick Launch on the right there is a link to Content Sources. By default your local SharePoint sites are added. From Crawl Setting click Create Schedules, create a daily schedule for Full Crawl.


This can be done for incremental too, but should have a much higher frequency, maybe every 15 mins or so.

 You can start a Full Crawl right from the content sources by click on their drop down menu.

Adding a New Content Source


Lets say you have a file share with tons of documents, obviously that's what SharePoint is their for replace, but many still have it. Then you can add a File Share as a content source so its available from SharePoint Search.


Configure it:


Make sure that the user used to search have access to the file share, only read access needed.

Check Logs

Crawling generates logs that you can read to make sure their aren't any error etc. You can find the logs from the Quick Launch under Crawl Log.

Note: A common error when crawling SharePoint Sites when you have specified an URL in the search Start Addresses.


Access is denied. Verify that either the Default Content Access Account has access to this repository, or add a crawl rule to crawl this repository. If the repository being crawled is a SharePoint repository, verify that the account you are using has "Full Read" permissions on the SharePoint Web Application being crawled.


A fix for that error is found at Sensoft2000 blog.


Create the Search Center


Now the pure basics is up, but its enough to use the Search Center. You have probably noticed their is an Search feature already on SharePoint sites, but they only search within the Site Collection. Even if you only have one Site Collection on your intranet it will still exclude My Site where search on people are done.

Create a new Site Collection from Central Administration:


This Site Collection could be used on its own and you can connect your other Site Collections to use this Search Center when you use the search included on all pages.

Configure Site Collections to use the Search Center:


Here is an example of how it will look after you have connected it.


Monday, September 26, 2011

Extend Web Application

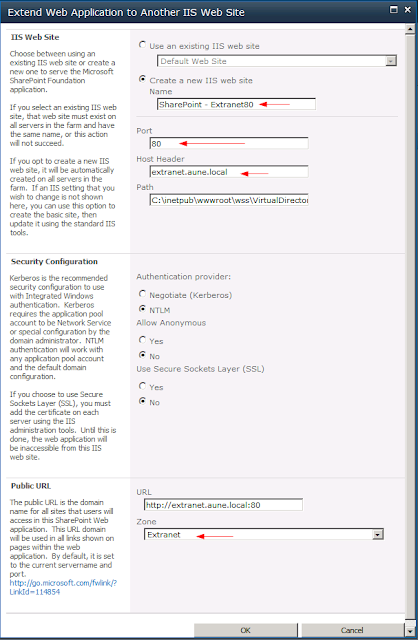
Extending a Web Application is just a couple of clicks in Central Administration. Lets say I want an extranet for the portal.aune.local created in the previous post.

Extend the SharePoint - 80


Open Central Administration and go to Manage web applications:

 Chose the SharePoint - 80 and click Extend on the Ribbon:


Configure:

Note: I haven't used any different Security Configuration, so this only show how its done. But obviously for an extranet the SSL would be a choice to consider.


Configure DNS


Make sure to configure your DNS records, I have used a CNAME, but you could just use a A record too.


Just for good measure, Reload:


That's all, now you can access the site at extranet.aune.local.

Sunday, September 25, 2011

Network Load Balancing

In this post I'll cover the basics of setting up Network Load Balancing with the free Feature included with Windows Server 2008. The goal with this is that you can take one server down without the users noticing it, and of course to balance the load between them for best performance.

Read more about NLB on technet.

In this scenario I have two SharePoint 2010 Servers in one Farm (AUNE-SH01 and AUNE-SH02). And I'll set it up the cluster to use portal.aune.local at IP 192.168.2.105. 

First you need to activate the feature on both servers, this is done with Server Manager.

Install NLB

     Open Server Manager and add feature:

     Install the Network Load Balancing Feature


Repeat this on both servers


Configure the Network Load Balancer

This part can be done on either of the two servers.

1. Open the Network Load Balancing Manager:


2. Right-click the cluster node and click; New Cluster

 3. Type in the name of one off the servers and click connect:


4. Chose an IP for the new cluster, in this case 192.168.2.105 is used, just make sure its an available IP.


5. The parameter for the cluster I have entered a Full Internet name and changed the mode to Multicast.

6. Under the port rules you can specify ports that will be balanced, I didn't change this. But in a production environment you could for example balance port 80/443.


7. Now the cluster is in place and the second server needs to be added, AUNE-SH02. Right click the new cluster and click Add Host To Cluster.


Configure the DNS

You'll need a new record for the cluster, 192.168.2.105. 

Open the DNS Manager, find your Forward Lookup Zone and right-click and New Host:


Configure IIS Bindings

Not done yet, the IIS server needs to be edited on both servers to set correct bindings.

Open the IIS Manager, find your SharePoint site and right-click and then Edit Bindings...:


Edit the entry already there and change the host name to the new portal.aune.local:


Configure SharePoint
The final part, configure the Alternate Access Mappings. 

Open Central Administration and find Configure alternate access mappings under System Settings:
Edit Public URLs for your collection, this example the SharePoint -80 is used.

Change the Default value to http://portal


That's it, your should now be available to connect to http://portal.aune.local.

Note: Just to be sure, restart both IIS servers.


In a later post I'll cover failover clustering the SQL server.

Thursday, September 1, 2011

SPD Workflow: Get Quarter based on Date

From time to time you need some output data that are not obviously available in SharePoint Designer when using out of the box actions. Such an output was needed the other day, and it was setting which quarter the current item was updated. The quarter should be used for different aggregations. With only SharePoint Designer and OOTB actions it didn't look like an easy task, but it turned out it was.

What was need was an constant variable, constant in the terms of characters returned. After some testing on different return types I figured out that ISO Formatted always returns the same amount of characters. And with another OOTB action, the Extract Substring of String from Index with Length.

First create a variable of type String, in the example its called "finnMnd":


I have used a parameter of type Date, "Start Dato", this could be any field of type Date. And the Return field as should be ISO Formatted.


After that we need to extract the month, and the month is always starting on position 6 with length of 2.


We have the number for the month in the variable "finnMnd". Now its only needed to do some checks and set a variable to 1. Quarter  2. Quarter etc with use of the condition "If any value equal value".